Smart LED bulbs have revolutionized home lighting, combining efficiency with convenience. As a significant part of the smart home ecosystem, these bulbs can save up to 80% on energy costs compared to traditional incandescent bulbs, according to a 2023 study by the U.S. Department of Energy. More households are adopting this technology, with the smart bulb market projected to reach $15 billion by 2027.
However, many homeowners remain uncertain about how to install smart LED bulbs in their home. While the process can seem daunting, it doesn’t have to be. Understanding the right steps can simplify the transition to a more intelligent lighting system. This can lead to enhanced control and customization in your living space.
Learning how to install smart LED bulbs in your home is crucial for maximizing their benefits. Each bulb offers features like color changing and remote control, which enhance the user experience. Yet, improper installation may diminish these advantages. Therefore, understanding practical installation methods is essential for reaping all potential rewards. Let's explore the top ten ways to help you light up your home smartly.
Smart LED bulbs revolutionize home lighting, merging technology with efficiency. These bulbs consume about 75% less energy than traditional incandescent bulbs, according to the US Department of Energy. This significant reduction in energy usage translates to lower electricity bills and a smaller carbon footprint, benefiting both homeowners and the environment.
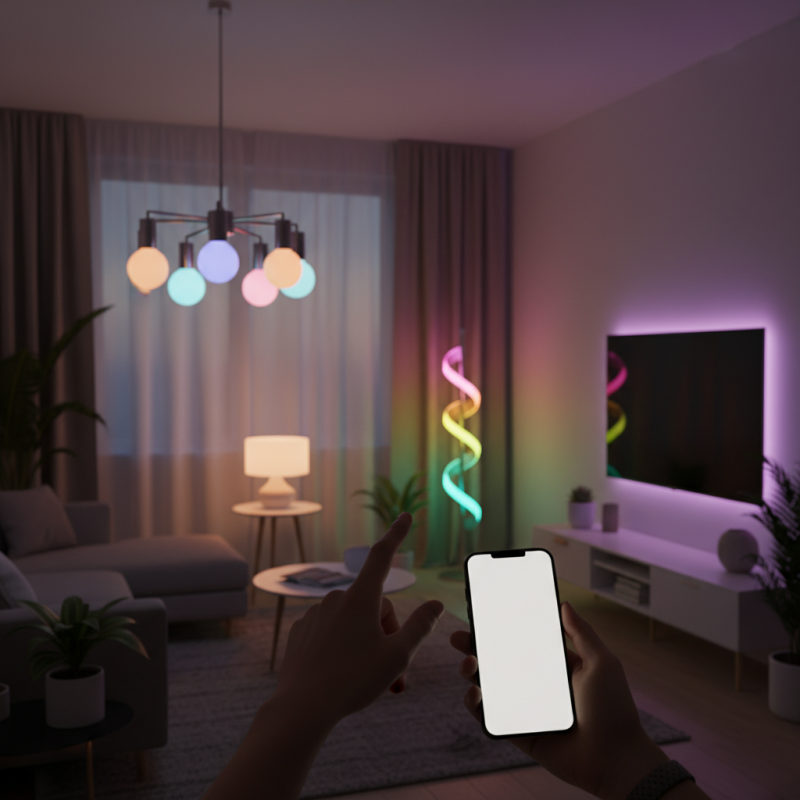
The features of smart LED bulbs extend beyond energy savings. They offer customizable lighting options, allowing users to change colors and adjust brightness via smartphone apps or voice commands. A recent survey showed that 80% of users reported increased satisfaction from having control over their lighting. However, not all users find them easy to set up, and connectivity issues can arise. These challenges may deter some homeowners from fully embracing the technology.
Moreover, the integration of smart LED bulbs into home automation systems can lead to increased convenience. Yet, some users feel overwhelmed by the multitude of options available. According to a report by Navigant Research, nearly 40% of potential customers hesitate due to the complexity of smart home setups. This indicates a need for clearer guidance and simplified installation processes to enhance user experience.
This chart illustrates the various methods for installing smart LED bulbs, showing the popularity and ease of use of each method.
When choosing the right smart LED bulbs for your home, consider the brightness and color temperature. Brightness is measured in lumens. A higher lumen count means a brighter light. For cozy living rooms, opt for warm white tones around 2700K. For workspaces, cooler whites around 5000K may enhance focus.
Compatibility is another crucial factor. Ensure your smart bulbs can connect with your current smart home devices. Some bulbs work best with specific ecosystems. Research their compatibility with devices and apps you regularly use.
Battery life and longevity are also significant. While smart bulbs often last longer than traditional bulbs, not all are built the same. Evaluate energy efficiency to lower your electric bill. Read user reviews to gauge reliability. Though installation may seem straightforward, confusion can arise during setup. Follow instructions carefully for a smoother experience.
| Method | Description | Benefits |
|---|---|---|
| 1. Choose Compatible Bulbs | Select LED bulbs that work with your home automation system. | Ensures seamless integration and control. |
| 2. Install a Smart Hub | Set up a hub to connect various smart devices. | Centralizes control for all smart devices. |
| 3. Use Smart Apps | Download the app for remote management of your bulbs. | Convenient access to customize settings. |
| 4. Set Schedules | Program bulbs to turn on/off at specific times. | Enhances energy efficiency and security. |
| 5. Group Bulbs | Create groups for simultaneous control of multiple bulbs. | Simplifies management for larger areas. |
| 6. Implement Voice Control | Connect bulbs to a virtual assistant for voice commands. | Hands-free convenience for lighting control. |
| 7. Explore Ambiance Options | Experiment with various colors and brightness settings. | Creates personalized moods for any occasion. |
| 8. Update Firmware Regularly | Keep your bulbs' software up to date for new features. | Ensures optimal performance and security. |
| 9. Troubleshoot Connectivity Issues | Identify and fix issues with Wi-Fi or app connections. | Maintains seamless operation of smart lighting. |
| 10. Experiment with Automation | Use advanced settings for automated lighting scenarios. | Enhances convenience and energy savings. |
Preparing your home for smart LED bulb installation requires careful attention to your existing fixtures. Many homes still use outdated fixtures that may not be compatible with smart bulbs. It's recommended that homeowners assess their existing light fixtures and sockets first. The Department of Energy highlights that proper fixture compatibility can improve energy efficiency by up to 20%.
Potential issues may include non-dimmable fittings or incompatible wattages. Ensure that your fixtures are rated for the wattage of the smart LED bulbs you wish to install. Removing old incandescent bulbs and checking your fixtures for any wear or damage is essential. This process can help prevent overheating and safety hazards.
After confirming compatibility, consider the ambiance you wish to create. Fixtures may affect light color and brightness. According to industry reports, optimal smart bulb placement can enhance room atmosphere significantly. Evaluate spacing and height for the best effect. While installation may seem straightforward, overlooking these details can lead to less than satisfactory results. Taking the time to prepare properly can lead to a more enjoyable smart lighting experience.
Installing smart LED bulbs can transform your home lighting. Here's a step-by-step guide to help you succeed.
Begin by choosing the right smart bulbs for your space. Consider their brightness and color options. Measure your fixtures to ensure compatibility. Next, turn off the power to the light fixture you’re working on. This step is crucial for safety. Once the power is off, remove the old bulb carefully. Don't rush; damaged fixtures can lead to complications later.
When you're ready, insert the smart LED bulb into the socket. Make sure it fits snugly. Turn the power back on and download the necessary app. Follow the instructions for connecting the bulb to your Wi-Fi. It's important to have a stable internet connection.
Tips: If the bulb doesn’t connect, try restarting your router. Sometimes, network issues can cause problems. Also, keep your app updated. Developers often release patches that enhance performance.
After installation, customize the settings to suit your preferences. Adjust brightness levels or set timers for convenience. Experiment with different colors to create ambiance. Avoid getting frustrated if everything doesn't work instantly. Technology can be finicky. Take your time to troubleshoot any issues you encounter.
Connecting smart LED bulbs to your home network is a crucial step toward modernizing your living space. Begin by ensuring your Wi-Fi signal is strong in the areas where you plan to install the bulbs. Weak signals can lead to connectivity issues. After securing a reliable connection, download the designated app for your smart bulbs. This app will guide you through the setup process and allow for seamless integration with your smart home system.
Once the app is installed, follow the on-screen prompts. You may need to create an account if you're a first-time user. Remember to have your Wi-Fi password handy. When adding a bulb, ensure it's powered on and within range of your router. Sometimes, the device may take a moment to appear on your app. Patience is key. If the bulb fails to connect, try resetting it according to the instructions.
This process can be a bit frustrating at times, especially if you're new to smart technology. Some users report difficulties during setup, while others find it straightforward. If you encounter issues, consult online resources or guides. The benefits of successful installation, like remote control and energy savings, make the effort worthwhile. Keep experimenting until you achieve a flawless setup.
: Assess your current light fixtures and sockets. Ensure they match the wattage and features of smart bulbs.
Issues include non-dimmable fittings and mismatched wattages. Check for these before starting the installation.
Turning off the power prevents potentially dangerous electrical shock. Always prioritize safety during installation.
Remove them carefully. Inspect your fixtures for wear or damage to avoid future complications.
Choose the right brightness and color. Consider spacing and height of fixtures for optimal effect.
Restart your router. Check your internet stability and ensure the app is updated for best performance.
Use the app to adjust brightness and colors. Set timers for convenience based on your preferences.
Don't rush. Take time to troubleshoot. Technology can be frustrating; patience is key to finding solutions.
In the quest to enhance your home’s lighting, learning how to install smart LED bulbs in your home can significantly transform your living space. These bulbs offer various features and benefits, such as energy efficiency and customizable lighting settings, making them a popular choice for modern homeowners. When selecting the right smart LED bulbs, consider factors such as compatibility with your existing fixtures and the specific functionalities you desire.
Preparing your fixtures for installation is crucial. This involves ensuring that your current lighting setup can support smart bulbs. The step-by-step guide provided in the article will walk you through the installation process, from safely removing old bulbs to fitting in new smart ones. Finally, connecting these bulbs to your home network and app allows you to control your lighting seamlessly, further enhancing the convenience and enjoyment of your smart home experience.
Luma Bulb